This past summer I took my first foray into long hiking, spending 22 days logging the 282 miles of the Maine Appalachian Trail. By no means do I consider myself a trail expert from this one adventure, but I did learn a lot of things I wished I’d known in advance. Hopefully this article will help other trail rookies avoid some of the mistakes I made. If anyone has more to add, please do so via comments.

1. The cool kids are minimalists.
There are two types of hiking equipment: absolute essentials and things you think you’ll “need.” Prior to embarking on our trek, I met an experienced AT hiker who told me, “You’ll be surprised by how little you’ll need.” She might have been Yoda in disguise. While my brother and I slugged along with 40+ pound packs, we met a thru hiker trail named Hotpants whose pack was under 20. Granted, he had made concessions on things we weren’t willing to do without (for example he was hiking in swim trunks), but there was no need for us to be around 40 if he could do the same hike under 20. Things you “think” you’ll need, need not be packed.
2. Everything is about weight.
When doing product comparisons, the primary criteria for every piece of equipment packed should be weight. I certainly made the mistake of thinking “a few ounces here and there” won’t matter. What I failed to foresee is that ounces quickly add up to pounds. For example, I went with the L.L. Bean White Mountain pack, sold on its many compartments and favorable price tag. While it was a rugged pack that took the abuse and then some, I would have been better off with a comparable Osprey that runs two to three pounds lighter. It’s also worth noting that I didn’t need a pack as big as the one I used.
Weight compare even the smallest items—use a kid’s toothbrush and one ounce sample toothpaste tubes—and there’s no reason you can’t pull off a 30-pound pack.
3. Plan your food before buying a camping stove.
Trip planning in the dead of winter I got a little overzealous and bought the two-person Jetboil, thinking I’d be making meals for my brother and I. When it came time to get food, we mostly bought the freeze dried meals where all you have to do is boil water and pour it into the food pouch. These meals were great, but the two-person cooking stove was overkill for them. To just boil water, I should have gotten the Jetboil Flash Personal Cooking System.

The Jetboils are pricier than comparable stoves but are completely worth it. They also weigh more, which I realize doesn’t jive with previous advice. However, these stoves boil water about as quick as you can pour it. In 22 days on the trail, cooking twice a day (plus a few extracurricular burner experiments…let’s just say we may have used the burner to start a campfire or two when it was wet) we only used three fuel canisters. So while the stove itself weighed more, the lack of fuel weight made it about a scratch with creating a homemade penny stove. Of course, there’s no replacing the cool factor of making your own stove.
To do it all over again, or for any shorter hike in warm weather, I would strongly consider forgoing a stove altogether in favor of wraps filled with prepackaged tuna or ham salad.
4. Go number two early.
If you’re going to utilize the outhouses, something I don’t particularly recommend if spiders earn frequent flier miles in your nightmares, it’s best to take care of business first thing in the morning. Waiting until late in the day just gives the sun time to turn the outhouses into ovens of over baked…well, you probably get the picture.

5. Care for your feet like you would a newborn child.
This can’t be understated. Try to find a couple times a day to take your boots off and air out your feet, especially during the first week on the trail. Carry at least three pairs of socks: one for morning wear, one for a mid-day change, and the backup pair should either of the previous two in any way be unable to fulfill its duties. A backup backup pair isn’t a bad idea either. For first aid, second skin, blister band-aids and skin lubricant are all must packs.
As for footwear, you want a boot that has the comfort of a sneaker (think trail runner), provides ample ankle support and is durable. Take your time to visit several stores and try various boots. I made the mistake of ordering L.L. Bean’s Gore-Tex Mountain Treds online without really consulting anyone. While they were durable and certainly saved me from numerous sprained ankles, I had missed a key piece of info—the boots are primarily for day hiking. As a result they brutalized my feet (four months later my toes are just now getting back to normal sensation). In short, my bad.
It’s also not worth falling in love with Gore-Tex. All Gore-Tex really means is that the boots are harder to get wet inside. Water will eventually find a way, and when it does, it will take Gore-Tex boots longer to dry. As an aside, the best method to dry out boots is to stuff them overnight with newspaper.
Lastly, don’t for one second think about packing a backup pair of sneakers or boots. It’s a waste of space and unneeded weight. For alternative footwear, Crocs are a hiker’s best friend. Just don’t lose one—you’ll be trail named “Half Crocked.”
6. Be courteous in the morning.
It’s easy to be grouchy in the morning. Your feet and knees will be aching, clothes will be cold and damp. It’s times like this when you want to feign kindness and let others go up the trail first. Better someone else’s face clearing the spiderwebs than yours. And yes, that’s how I roll.
7. Keep a clean set of clothes.
For hiking clothes you can get by with rotating two dry wick t-shirts and two pairs of shorts. You’re going to stink. Live with it. What you don’t want to do is wear rain gear on a 90 degree day while doing laundry on a town stop. Trust me, not fun. For this, pack (in a separate Ziplock bag) the lightest t-shirt and soccer shorts you can find.
8. Hand sanitizer makes a decent deodorant.
I give my brother Brad credit for figuring this one out. Hand sanitizers kill 99 percent of germs and bacteria; it’s the bacteria that makes you smell like a transfer station. This isn’t going to keep you from attracting flies by any means, but it will lessen the range of your stink, stank, stunk. Carrying actual deodorant just adds unnecessary weight and there’s the risk of it melting in your pack. The more multipurpose items like this that can be packed the better.
9. Stealth camp sites are often the best.
There’s an officially designated camp site approximately every ten miles of the Appalachian Trail. These sites are marked on the trail maps and they often include both a lean-to and tent sites (either platforms or open ground), though some sites are tenting only. There are also numerous unofficial, or stealth, tenting sites along the trail. Since these sites receive less occupants, they’re often in better shape. The general rule of thumb is that wherever there’s water you’ll find a stealth site, however, this isn’t 100 percent.
There are no outhouses at stealth sites, which isn’t necessarily a bad thing, and camp fires are generally frowned upon if not outright forbidden. Going without a fire isn’t really a big deal either. When it gets dark out on the trail, it’s time for bed. The only reasons we started a fire were to dry out after it rained, to lessen an unruly load of trash (foil doesn’t burn, carry it out), or to keep a randy moose confused by Brad’s trail beard at bay.
10. Treat your body like your pack.
Weight is weight. It doesn’t matter if it’s an extra item in the pack you don’t need or the “winter pounds” you’ve put on over the holidays, your legs have to carry it all. Quite simply, you’ll be miserable if you attempt to hike the Appalachian Trail out of shape. On the other hand, if you’re looking for a rapid weight loss plan, hit the trail!

11. Don’t leave home without trekking poles.
I originally had a cavalier attitude toward trekking poles…and then I tried hiking the first leg of our trip without them. I was a fool. They minimize the impact on your knees when descending a mountain, gain lift going up, and on flat ground help you maintain momentum when your body otherwise wants to collapse. There are times when poles can hinder more than help, such as during the Mahoosuc Notch boulders, but they collapse and are easily attached to your pack for these occasions.
12: The Monson decision.
From Andover to Stratton, the Maine Appalachian Trail offers several trail towns ideally suited to getting a bed, shower, and a hot meal stuffed with carbohydrates. The one must stop is Monson, where hikers have the choice between staying at Shaw’s or The Lakeshore House. We chose Shaw’s for its history and well deserved place in AT folklore, and were impressed with the hospitality that we received. Those we talked to who stayed at The Lakeshore House were equally pleased with their decision. The funny thing is that whichever place you choose, you will likely experience both. They are a close walk from each other and while The Lakeshore House is one of two restaurants in town serving dinner, Shaw’s is THE place for breakfast. Shaw’s also offers long-term parking for section hikers planning a trek through the 100-Mile Wilderness.
13. Two things I wished I’d packed.
While much of the advice in this article has been focused on eliminating things you don’t need, there were a couple items I’d wished I had. The one I fantasized of the most was gaiters. In my pre-hiking spending spree I’d drawn the line at gaiters with the rationale that tics aren’t much of a problem in northern Maine during late July and August, and I was right in this regard. The problem was all of the sticks, pine and fir needles and other debris that I was constantly cleaning from my boots.
The other item I missed was a seat pad. It seems like such a minor, luxury-type item, and even I’m thinking “c’mon, toughen up” as I write this, but at the end of a full day on the trail, especially when it rained, all I wanted was something dry to sit on that wasn’t a breading ground for hemorrhoids.
14. Take a hike.
If you’ve never done any long hiking, hit the trail for a three day weekend prior to your full trek. This will give you the opportunity to really see what you do and don’t need. On my practice hike I carried with me several things I really didn’t need, most notably my deer knife. Still not sure why I thought it was a good idea to bring the knife. It’s not like I was going to field dress my brother if we ran out of food. You’ll also want to use the opportunity to test your equipment (my sleeping pad had a hole in it on the first time out) as well as see how your body reacts to multi-day abuse.
Good luck. Happy trails.
Hello Daren,
Read your article in DE as well as the 14 tips for hiking MAT. I was wondering at what age u would have kids hike MAT? Mine are 5 now, boy and a girl. Thoughts?? We’re in FL so ww have flat trails:)Thank you. Chris
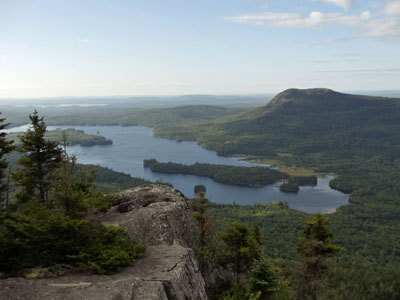
Where was that last picture taken? Amazing view!
You’re testing my memory, Mazz. It’s in the 100-Mile Wilderness, but I don’t remember exactly where. Possibly a ledge near the beginning of the Barren Chairback Range.
that was taken on barren ledge, you are looking at lake onawa and borestone mountain.
borestone is 11 miles outside monson and is an awesome day hike, barren ledge is also doable as a day hike.
http://maineaudubon.org/find-us/borestone-mountain-sanctuary/